Parrotlet Egg and Parrot Egg Incubation written by – Howard Voren
|
|
| During the many years that I traveled through the jungles of Central and South America, there was never an egg under incubation back home on the farm. We at Voren’s Aviaries never “counted our chickens” before they hatched. Due to the fact that I was near a jungle somewhere in the world about half the time, there was never anyone to tackle the responsibility who wasn’t already overburdened by my absence. As my collection grew near my goals and I began to curtail my travels, I became very involved with incubation.Well over 8,000 psittacine eggs have passed through my various incubation procedures during the last four years. The numbers of birds that we have hatched successfully staggers most people (over 1,500 this year alone). I myself am more staggered by those that don’t hatch. Infertility can be depressing, but what really hurts are the babies that die in the shell sometime after the second week of incubation.
Due to my success as an aviculturist, I am called on by many professional breeders for advice. Being in this position allows me to see that everyone who incubates large quantities of eggs has similar problems. Although it is impossible to help people solve problems that I have not been able to solve myself, this communication allows me to question them freely and stockpile facts–facts that at some point lead to answers. The first fact that becomes glaringly apparent is that the first 10 days to two weeks of incubation is the critical period. Correct procedures during this initial time will almost always result in a successful hatch. Without exception, anyone incubating a reasonable quantity of eggs who claims a success rate of over 85 percent is not pulling the eggs as they are laid. They are either allowing the hen to keep the eggs until the entire clutch is laid, or they are leaving them with her for two weeks of natural incubation. Those who allow the hen to sit for two weeks have success rates well into the 90-percent range. Once this critical two-week period is over, the egg can be successfully brought to term with a wide variety of temperatures and humidities. Temperature Under natural conditions, the most important factor in successful incubation is heat. As long as the egg gets enough of it and is not permitted to lose too much of it for too long a time, everything will be fine. This is true even though the actual temperature of the egg fluctuates drastically when the hen is off the nest. Hens that “sit tight” (those that rarely leave the nest) do not have a noticeably higher hatch rate than those that leave the nest at regular intervals. From this, it’s safe to assume that eggs have evolved to be less sensitive to temperature drops than to other more unnatural circumstances. One thing that a bird cannot do no matter how hard it may try is overheat an egg. This, of course, is possible in an incubator. Overheating is one of the things that an egg is very sensitive to and can result in eventual death. Temperatures that have been used successfully range from 98.7 to 100 degrees Fahrenheit. At Voren’s aviaries, we have settled on 99.3 degrees Fahrenheit. Of course, the best temperature for you to use will depend on many different factors. The most important of these factors is humidity. Humidity It has been long assumed that 50-percent humidity is required for successful hatching. This is not necessarily the case. Humidities ranging between 38 and 52 percent have been used by different professionals under different circumstances. All have proven successful in the situations used. An egg should undergo a specific percentage of weight loss during the incubation period. This weight loss is achieved by the evaporation of water through the pores of the shell. Since increasing the incubation temperature can shorten the time period in which it takes a chick to hatch, there is less time for the required water loss to take place. If using these higher temperatures, the lower humidities should be used to allow sufficient water loss during the shortened time period. Conversely, if lower temperatures are used, the chick will take longer to hatch, and higher humidities should be used in order to keep too much evaporation from taking place.. I have experimented with different humidities and found that under the same environmental circumstances, large eggs do better at lower humidities (38 to 45 percent), and smaller eggs do better at the higher range (46 to 52 percent). In fact, it is now standard procedure for me to incubate all macaw and Amazon eggs at between 38 and 42 percent humidity. Conure eggs at these humidity levels experience too much water loss and die, or hatch in a dehydrated state. For conures, we use a humidity level of 48 to 52 percent. I believe this is a function of eggshell calcification differences rather than a difference in the amount of water held in large eggs versus small eggs. In my aviaries, the larger birds generally produce eggs that are harder and thicker-shelled than the conures’. Logic tells one that an egg with a thicker and denser shell would require a lower humidity level in order to incur the same water loss as a thinner or less dense-shelled egg. Differences in diets and individual metabolisms are the major reasons that there are so many different reports as to the ideal humidity to use in a specific case. One must not lose sight of the fact that a bird can sit on an egg under almost any reasonable humidity and hatch it regardless of how marginally over or under calcified it might be. This tells me there are major flaws in our basic incubation philosophies. Turning The next most important aspect of incubation is turning the eggs. The number of times per day that a parrot egg should be turned in the incubator is still a subject of debate. Poultry research supports the theory that eggs should be turned between 12 and 24 times a day. However, some people, myself included, think that between four and eight times per day is sufficient. Under my incubation conditions, I noticed a marked difference in development when the incubator was set to turn the eggs only six times a day instead of 12 times. The eggs developed more evenly. That is to say that the veins that grow out from the embryo covered a larger area and reached around to the “underside” of the egg much earlier in the incubation process than those turned every two hours. There was no difference in incubation time, but hatchability was increased. Vibration Vibration is probably the most unconsidered variable that is responsible for mortality in the shell. It also explains why under “exactly” the same conditions, two different people can have completely different results using the same model incubator. Minor differences in mounting positions, as well as the age and type of fan motors used, can have a great effect on the amount of vibration that is transferred from your incubator to your eggs. Eggs in their natural state are incubated in a vibration-free environment. It stands to reason that even the slightest bit of vibration can affect the development of those tiny veins in a negative way. The question is, how much can they stand before vibration proves lethal? Hatching The first sign that hatching is around the corner is when you see the egg “draw down.” This is when the air space in the egg enlarges. It will change from its normal round appearance to elliptical. One side of this now-elliptical air cell will extend down one side of the inside of the shell. The other side remains up near the top of the egg where it has always been–hence, the elliptical appearance. At this point, many aviculturists move the eggs into a hatcher. Others prefer to wait until the first “pip mark” appears on the egg. The “hatcher” is an incubator with high humidity and no turning mechanism. The high humidity is to make it easier for the chick to hatch. Since the incubation process is complete, the high humidity (the higher the better) does not interfere with evaporation but does make it less likely for the internal membrane to stick to the hatching chick. Chicks that get stuck to the membrane must be assisted out of the shell, or they will die trying to get out. Normal time lapse between major draw down and hatching is usually about three days. Hatch Assistance Knowing when to enter into an egg and when to stay out is an art in itself. Many chicks have been saved by timely assistance, but anyone attempting this must remember that it is always a gamble. Hatch assist is something that you can consider if you have a chick that has come to term but for some reason does not hatch. One should wait at least for an internal pip before even beginning to monitor an egg for possible need of assistance. An internal pip is when you can see the chick moving in the area of the air cell. This happens just prior to the chick attempting to break through the shell wall. Once broken through, the pip mark is called an external pip. If an external pip is not forthcoming, then there may be a need for assistance. You also may have a problem if a chick externally pips one pip and then stops. Stopping to rest after the first pip is normal. If, however, two days pass and no further attempt has been made to continue the hatching process (more pip marks), then help might be necessary. With either of these two problems (just internal pip or just one external pip), you would proceed in the same manner. Chip a small hole in the shell so you can see inside. There are some dental tools that are perfect for this work. You should make the hole where the pip mark is or where the pip mark should be. To determine where a pip mark should ideally be, estimate about 3/4 the distance down from the center of the top of the egg (the fat end) to where the expanded air cell ends along the side of the egg. If there is no pip mark, you will have to make a tiny hole. A small nail spun between the thumb and forefinger makes a perfect drill for this procedure. Once you have drilled a hole or located the pre-existing pip mark, begin to chip away tiny pieces of shell until you can see what is going on inside. Sometimes a chick will pip and get stuck to an overly dry internal membrane. If this happens, the chick will not be able to rotate and pip in enough spots to facilitate hatching. A sure sign of this problem is when you notice upon candling that there are no veins left on the inside of the shell. The feet appear to be moving freely, and the chick keeps pipping at the same spot. In the case of no pip mark other than internal, the problem could still be an overly dry membrane. It might also be a problem of the head being poorly positioned and unable to make an effective strike on the shell. Remember to keep the hole as small as possible. The membrane will usually be white in appearance. Paint the membrane with water using a tiny paint brush. This will make the membrane transparent and clearly show any veins that might still be carrying blood. If the chick has not come through the membrane and you are convinced that it is overdue, then make a tear in the membrane to free the chick’s beak and nostrils. Be careful not to break any blood vessels in the membrane. Only work in spots that are free of vessels. This allows the chick to breath and eliminates suffocation as a possible cause of death. You should now cover all but the smallest air hole with a small piece of tape. At this point, you have the choice of allowing nature to take its course or going in to complete hatching if you feel that there are no more live veins in the membrane, and the yolk has been completely absorbed. If the hole allows you to see that the membrane is completely devoid of veins and the chick has internally pipped and its only obstacle is a dry membrane, you might wish to take off the top of the shell and let the chick lift its head out of the torn membrane. When removing the shell and membrane from around the head, work from the nares back to the crown, if there are any hidden blood vessels they’ll be in the area of the crown. If no viable vessels are noticed as you proceed, then lift the shell and membrane off the bird’s crown down to the upper neck. If the chick is ready to come out, you will get what I call the “jack in the box” effect; that is, the chick’s head will pop straight up out of the fetal position. If the chick does not pop its head up and tries to return to the fetal position, even if you coax the head upward, it’s best to tape the bird in with paper tape (I use Micropore by 3M with great success) and try again in six hours. If the bird does pop its head up, at that point you can look down to see if there is any yolk that has not been absorbed. If none exists, the chick on the half shell should be placed in a small tissue basket back into the hatcher so it can crawl out when it is ready. This is when the last few veins at the navel have dried. Pulling a chick out of the half shell too early can cause it to bleed to death. If, however, you can see some yolk sac, you should place the chick’s head back into the “fetal” position, place the top of the shell back on the egg, and tape it together. Place the egg back into the hatcher to allow the chick to finish absorbing the yolk. A chick in this situation will have to be released from the shell at the proper time. Remember, always proceed with great caution. Good luck, and may all your eggs be fertile.
|
| The above article can also be found at . |
|
 Parrotlets for Sale
 All Babies
 Parrotel Live Video
 Lineolated Parakeets
 English Budgies
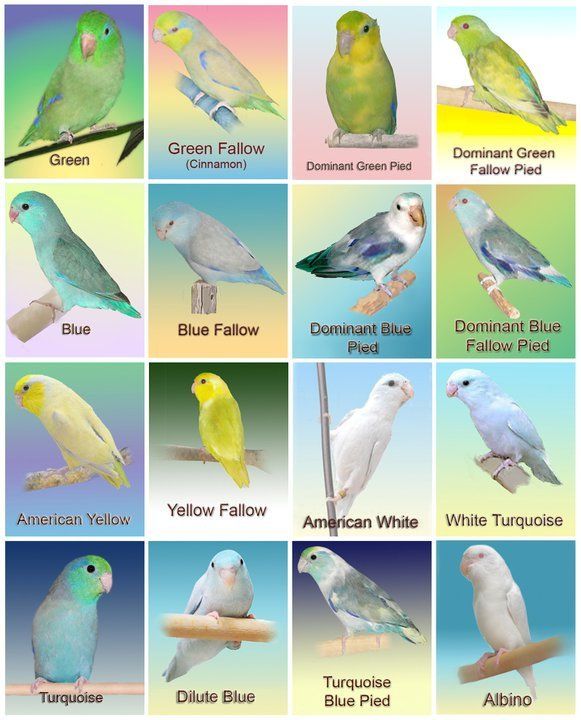 Parrotlet Color Mutations
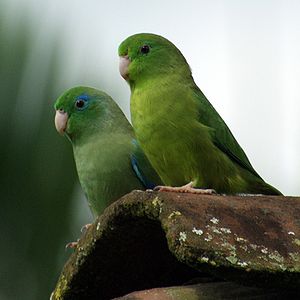 Spectacled Parrotlets